Setting Up Your Webhooks
Here's all the information you'll need to begin working with our webhooks. As always, if you have questions, feel free to shoot us an email at info (at) slicktext.com.
Your POST URL
Your POST url is where the Slick Text system sends data for all of your webhook events. All of the event data is sent through a single standard HTTP POST field formatted as JSON (JavaScript Object Notation). The name of that post field is data.
To enable your webhooks and specify your POST url, follow these simple steps:
- Log in to your SlickText account.
- Click on "My Account" in the top navigation bar.
- Click "Webhooks" in the left navigation bar.
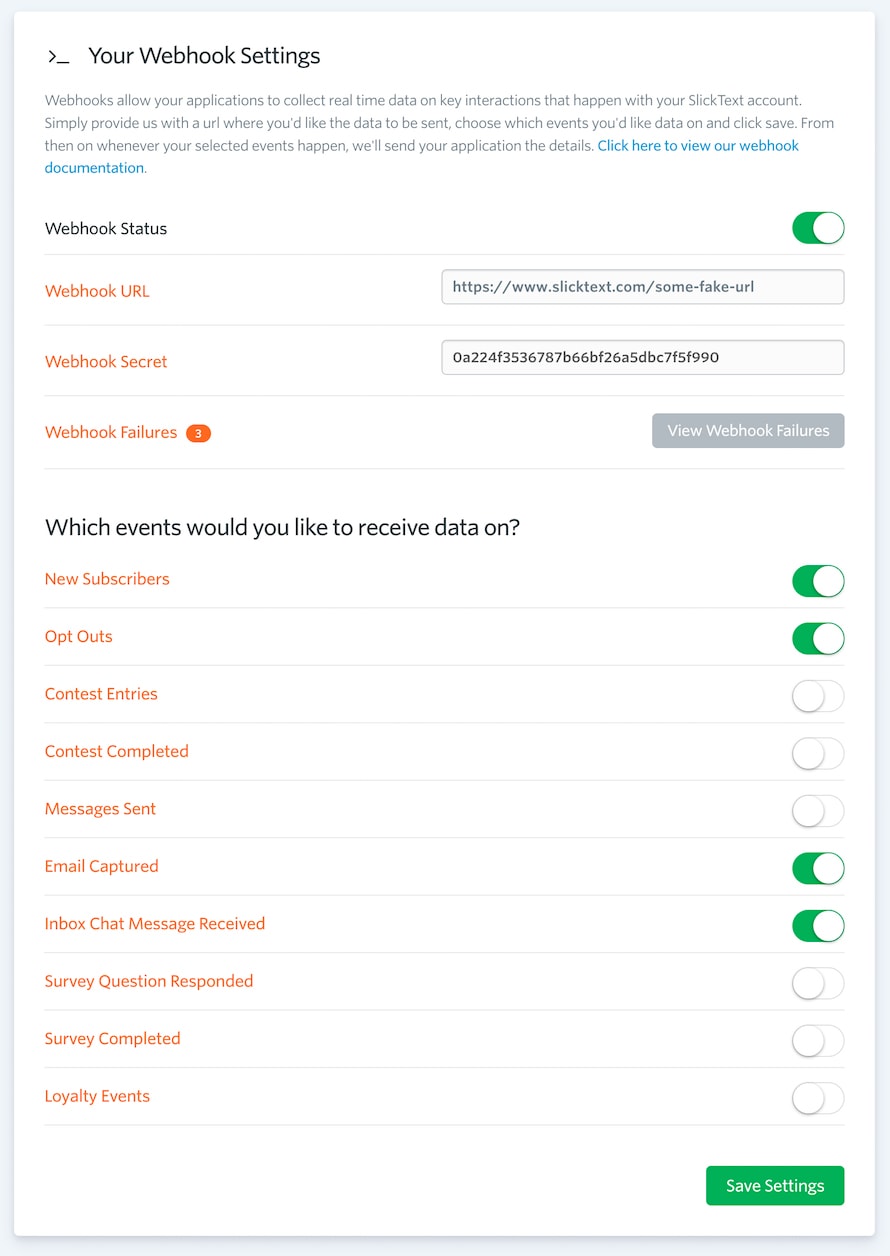
- Change your webhook status to "ON". This will expand down all of your webhook options.
- Enter your POST url in the "Webhook URL" text field.
- Choose which events you want to receive hooks for.
Choosing Your Events
When you changed your webhook status to "ON", you'll notice that several event options also become available. Select the individual webhook events that you would like to receive data for by simply changing it's corresponding switch to "ON". After you've finished enabling your events, click the green "save" button to save your settings. Once your settings have been saved, Slick Text will immediately begin passing you data as the events happen.
Responding to Webhooks
When a request is made to your POST URL, our system expects your application to acknowledge that the data was received by responding with a 200 level response code. Any response outside of the 2xx range, including 3xx redirects, will indicate to us that you did not receive the webhook data successfully. We do not follow redirects when sending webhooks.
All webhook requests have a 5 second timeout as well. It is expected that your application will respond within that time frame or it will be considered a failed request.
Request Failures & Retries
In the event that your application returns a non 2xx response code or does not respond within the 5 second timeout period, our system will consider the request failed. We will then reattempt the webhook 3 additional times at different intervals before considering it permanently failed. Each reattempt will be made to the current webhook POST URL.
The webhook attempt schedule is as follows...
| Request | Timing |
| Initial Attempt | Immediately |
| Reattempt #1 | Within 60 Seconds of Initial Attempt |
| Reattempt #2 | 60 Minutes After Initial Attempt |
| Reattempt #3 | 24 Hours After Initial Attempt |
Each webhook request will include an attemptNumber property in the data payload. This can be useful when needing to understand which webhook requests are reattempts of failed initial attempts.
Verifying Webhooks
Once you have your server configured to receive our webhook POST requests, you may want to take the extra step of limiting requests to those coming from SlickText. While this is optional, we do recommend it to prevent others from maliciously posting data to your service.
While you may choose to whitelist requests made from SlickText IP addresses, we don't recommend you do that. Our IPs will change from time to time and you may find yourself unintentionally blocking valid POST requests made from our system.
The recommended way to validate POST requests made from SlickText is to use your webhook secret. When you first create a webhook, a "webhook secret" token is generated. We use this token to create a hash signature for each POST request that is made. You can retrieve your token from the webhook settings page in your SlickText dashboard. Your secret token will never change unless you turn ALL webhook events off. If that happens, you will be issued a new token when you turn webhooks back on.
Whenever a POST request is made to your url, we include an X-Slicktext-Signature value in the request headers. This hexadecimal string is an HMAC digest of the post data using an md5 hashing algorithm and your webhook secret as the key. To validate a POST request from SlickText, simply use the same method to hash the post data and compare your output to the value of the X-Slicktext-Signature header. If they match, you can be sure the request came from SlickText.
// Capture the POST data
$postData = isset($_POST['data']) ? $_POST['data'] : false;

// Retrieve the X-Slicktext-Signature header
$postSignature = isset($_SERVER['HTTP_X_SLICKTEXT_SIGNATURE']) ? $_SERVER['HTTP_X_SLICKTEXT_SIGNATURE'] : false;

// Check for POST data and a signature header
if($postData !== false && $postSignature !== false)
{
	// Create a digest of the POST data
	$hmacDigest = hash_hmac('md5', $postData, getenv('WEBHOOK_SECRET'));

	// Compare the digest to the POST signature
	if($hmacDigest === $postSignature)
	{
		// Request valid! Let's do something!
	}
	else
	{
		// Request not valid
	}
}
It's obvious that your programming language and server implementation / configuration may differ from the example above. The goal is to provide you with a concept of how to properly validate a webhook POST request made from SlickText.
Troubleshooting Webhooks
While getting set up to handle our webhooks is fairly simple, you may run into some snags. In the event that things are not working correctly, here is a checklist of things you should run through to make sure you're moving in the right direction.
- Make sure your POST URL correct.
- Make sure your POST URL does not redirect.
- Make sure you have the appropriate webhook events turned on.
- Make sure your application is responding with a 200 OK HTTP response.
- Make sure your application is responding within the 5 second timeout period.
-
If you're using request validation, make sure it's per the example above. Test your hashing locally to make sure things are working correctly before going live.
Some items to look for when debugging your request validation are:
- Secret - verify that the secret is property set in your code, and is the same as the one displayed in your dashboard.
- Hashing algorithm - it should be an HMAC digest using the MD5 algorithm.
- Value type and encoding - our signatures are encoded as hexadecimal strings. Some HMAC functions may return a byte array or a base64 encoded string, so make sure you're comparing like-to-like.
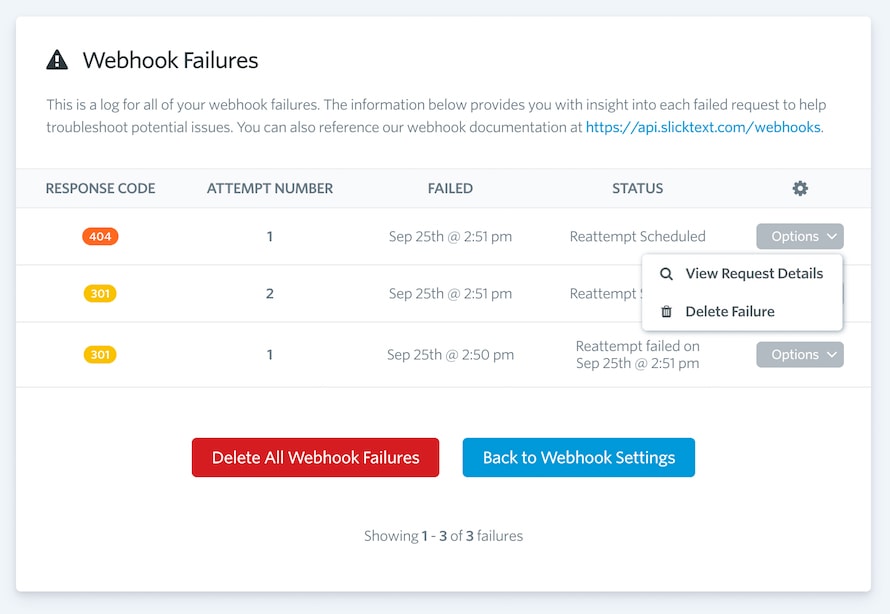
To help with troubleshooting webhooks, we expose all failed webhook requests in your SlickText dashboard. You can access them from your webhook settings page.
We will list each failed request, the response code we received, the attempt number, when it failed and what the current reattempt status is.
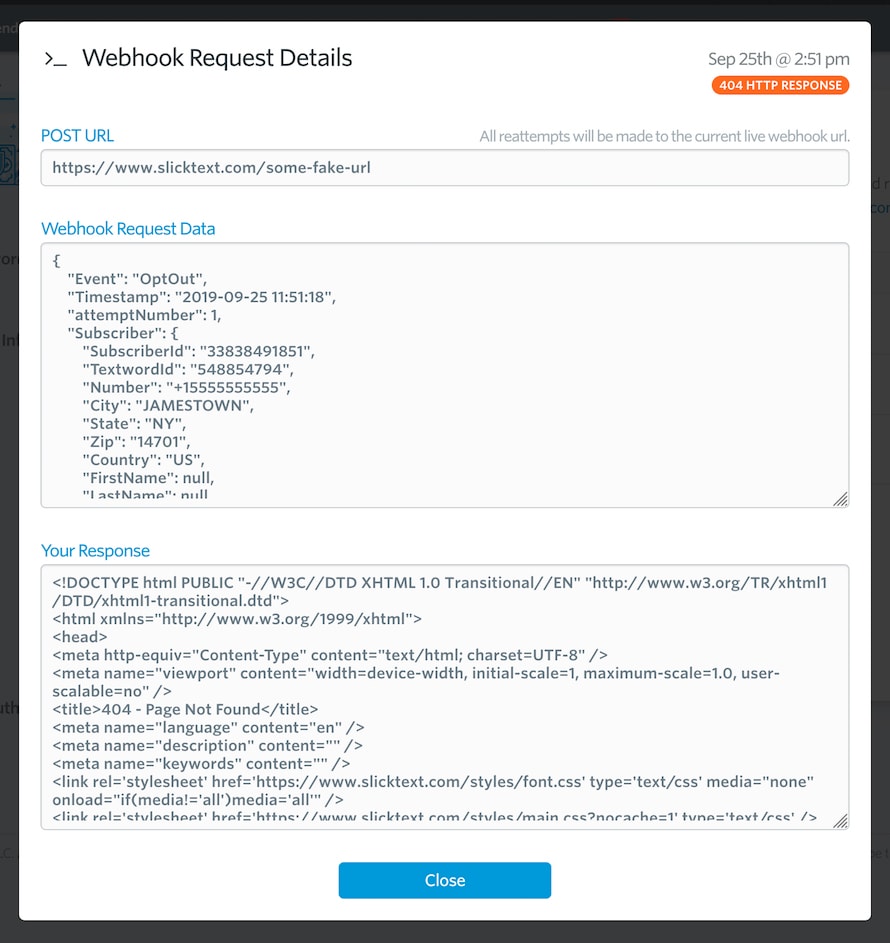
Additionally, you can view the details for any failed request. This includes what URL the request failed to POST to, what the data payload was and what your application responded with.